I got tired of switching from my lovely ThinkPad keyboard to the Dell one connected to my desktop so I decided to take the dive and setup Synegy keyboard and mouse sharing.
I have a nice three monitor setup on the desktop side of things ( that is a cool NVIDIA GeForce GTX 650 Kepler card driving three dell 2007FP monitors ) and my favorite Thinpad keyboard “running” on thinkpad X200T. The three dell monitors are situated above my thinkpad thanks to a practical combination between Ikea capita legs and a brown shelf that matches my huge Galant desk.
Considering this positioning we come to the conclusion that the thinkpad running ubuntu should be the synergy server and the dell workstation running 64bit windows 7 should be just a synergy client.
The first thing I did was to install synergy 1.4.x on windows, when I got to the point of connecting to the ubuntu synergy server I realized that the Ubuntu 12.04.1 LTS was running the 1.3.x version ( that means a different synergy protocol ), so I had to reinstall the synergy 1.3.x branch from this download location. Just for the record the errors that the synergy client was throwing at me was “failed to connect to server: incompatible client 1.3” .
The windows part it’s really easy but it it important to get the screen name, this is normally your computer name but just to be on the safe side you can check it in the “Advanced…” -> “Screen Name:”. This screen name it is used in the Ubuntu Synergy configuration file.
My computers are called paris (thinkpad) and quad(dell) so the resulting synergy screen names are paris and quad. What you have to do now is use your favourite editor ( nano should do it, vi is to complex 🙂 ) and create the ~/.synergy.conf with the following content:
section: screens

paris:

quad:

end
section: links

paris:

left=quad

up=quad

quad:

right=paris

down=paris

end
I just start the synergy server by running “synergys” from comand line in ubuntu and connect with the windows client to the ip of the synergy server. Now I am able to mode from the thinkpad to the dell via the right and upper side of the screen ( paris ) and come back from the quad via left and lower side of the screen.
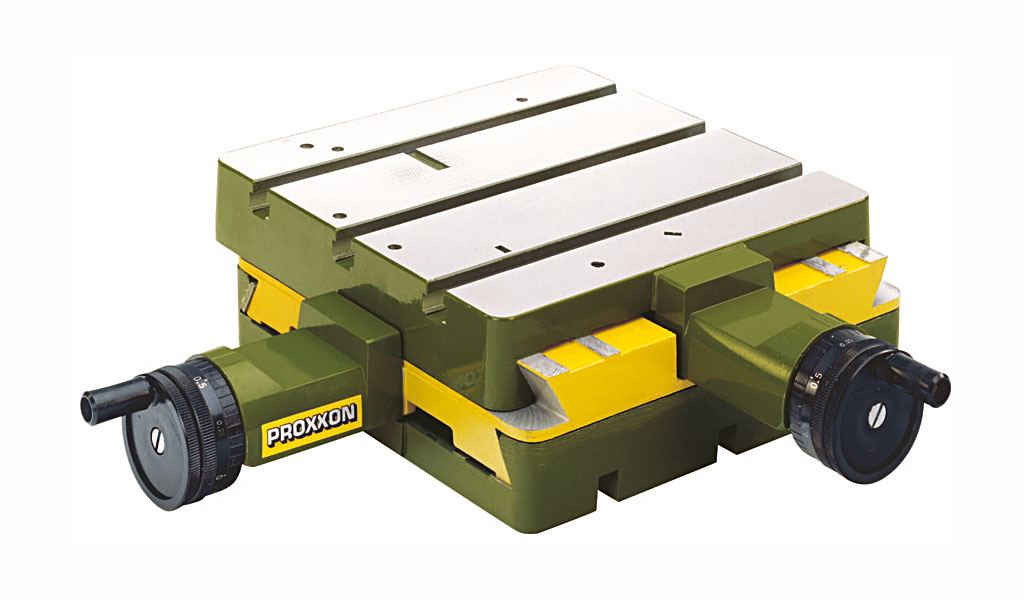 This year, after I have built a Prusa I3 printer, I have finally moved forward with the Proxxon KT 150 CNC conversion. Starting from product specifications and a few measurements I’ve managed to design, with the help of OpenSCAD , some great NEMA 23 mounts for the Proxxon KT 150. The motors are the ones that SparkFun sells but I have bought them from a great local supplier RoboFun. Specifications for the stepper motors can be found here.
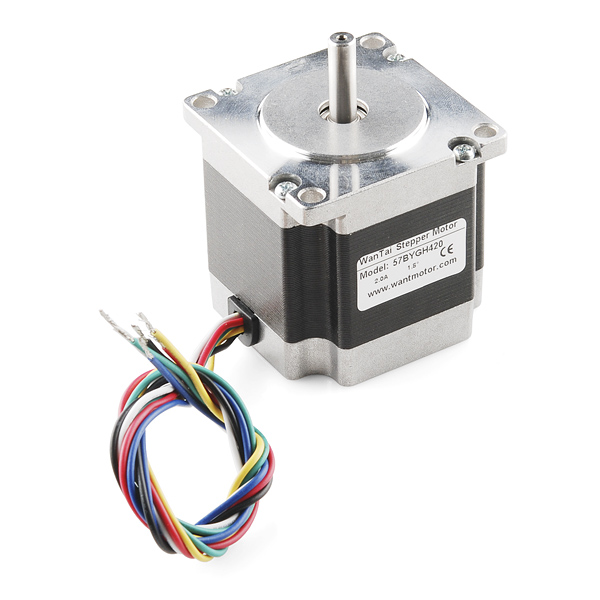 Without further ado, I would like to introduce you to my version of KT 150 CNC conversion mounts. You can download and use the mount posted here kt150-xy-mountv3.stl under Creative Commons Attribution-NonCommercial-ShareAlike license.